Photography in Aesthetic Head and Neck Surgery
Kenneth Hughes, MD
Introduction
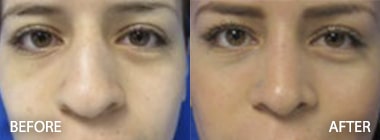
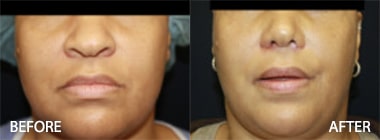
Photography is essential to documenting results in all forms of facial plastic surgery: brow lift, upper and lower eyelid surgery, face and neck lift, facial fat grafting and stem cell rejuvenation, rhinoplasty, chin implants, chin liposuction, and ear correction (otoplasty). For that matter, photography is important in all cosmetic plastic surgery. All plastic surgeons must acquire the ability to record their results as accurately and precisely as possible. Photography becomes a unique ally in this pursuit, and it is incumbent upon plastic surgeons to develop a relatively sophisticated understanding of photography and its components. Unfortunately, much of the art of photography must be self-taught.
With this is mind, this chapter represents a compendium of insights from several dozen amateur and professional photographers to help elucidate fundamental concepts in photography. The chapter further explores issues in photography singular to plastic surgery and reviews the plastic surgery literature as it relates to photography.
The Digital Revolution
The advent of digital photography has rendered conventional film all but obsolete as these digital images can be manipulated, archived, and reconstituted with software to create three dimensional images. Digital imaging and manipulation have revolutionized preoperative planning as well as patient counseling.
The advantages of digital photography are manifold and include no film or processing costs, no need for physical storage of slides or negatives, elimination of scanning of slides, immediate viewing of image, ability to erase images instantly and reuse space, digital compression and transmission for purposes of consultation or discussion.
Digital Image Capture
The development of the charge-coupled device (CCD) in 1969 created an image sensor tuned to the visible spectrum of light, which was able to convert captured light to electrical charge. An image is projected onto a capacitor array, causing each capacitor to store an electric charge proportional to light intensity at that location. Ultimately, these charges are converted to binary representation stored digitally. Most cameras are CCD or CMOS (Complementary metal–oxide–semiconductor), both of which are composed of silicon doped with other elements that allow light sensitivity. Red, green, and blue filter strips are placed before the sensor to enable digitization of the color components.
In common parlance, the digital image is captured across an array of pixels. Thus, the number of pixels becomes a determinant of picture resolution. However, the number of megapixels is only one factor. Pixel size relative to overall size of imaging area on the sensor is also important but difficult to determine. Thus, technical reviews and your own observations can prove more reliable.
Types of Digital Cameras
Digital cameras can be classified as “point and shoot” cameras and digital SLR (single lens reflex). Digital SLRs are very much like film SLRs apart from image sensor and the LCD screen. Point-and-shoot cameras have evolved tremendously over the last 5 years, many with manual controls that can produce very reliable, reproducible images with excellent resolution. Digital SLRs still have the advantages of greater aperture control, removable lenses, and better image quality secondary to larger pixel size. However, these SLR cameras are more expensive and require more maintenance (lens cleaning).
Understanding the Functions of the Digital Camera
Lens
In general, a lens in conventional film photography with a focal length from 90 to 110 mm is utilized for facial photography. Most digital cameras have preset focal length for portraits, or a portrait mode. This represents the correlative focal length for the smaller sensors in the digital cameras.
Aperture
The lens aperture is the size of the opening that admits light to the sensor. A wider aperture allows more light, while a narrower aperture, less light. There is usually an ample range of openings (f-stops) to allow for changing light conditions.
The larger the f-stop the more light admitted and the better suited to dim light situations. Most digital cameras, when using auto mode, perform these calculations to assure optimal aperture.The widest possible aperture characterizes the speed of the lens and refers to the ability of the lens to be used in low light without flash. The standard f/2 would be fast, while f/16 would be slow.
Shutter Speed
The shutter speed represents the amount of time the shutter is open. There is a reciprocal relationship between shutter speed and f/stop. Thus, there exist multiple combinations of shutter speed and f/stop that can generate the same amount of light reaching the lens.
Without a flash, slower shutter speeds may lead to suboptimal image due to hand motion of the photographer if the camera is not mounted. With a flash, shutter speed can be slower than 1/250.
ISO
ISO (International Organization for Standards) is a measure of the sensor’s sensitivity to light. One of the great advantages of digital cameras is that you can change the ISO settings, a characteristic that was film specific. However, as you increase ISO settings to compensate for lower light conditions, noise increases. Noise is the result of increased pixel sensitivity to light causing sensor misinterpretation. The lowest possible ISO setting should be utilized to maximize quality. Thus, changes in aperture, shutter speed, flash and ISO settings all affect the exposure and ultimate image generation.
Image Compression and Storage
Image data from digital cameras can be saved in several different formats, RAW, TIFF, and JPEG being the most common. RAW files represent the full uncompressed image file. RAW is not a standardized file format. RAW file formats differ from one camera manufacturer to another and require special software peculiar to that manufacturer. TIFF (Tagged Image File Format) uses lossless compression, which preserves image quality. This form of file compression creates a less compressed, larger file than that produced with JPEG. JPEG (Joint Photographic Experts Group) is the most common method of compression and can be done at different levels; more compression gives smaller files while simultaneously degrading the image. JPEG compression uses a compression algorithm which sacrifices image quality for smaller file sizes. In most digital cameras available, one can select Fine or SuperFine image compression which corresponds to higher quality (less compressed) JPEG setting. More specifically, in most digital cameras, there is a choice of resolutions, which can be as low as 640 × 480 pixels and as high as the resolution of the camera allows (e.g. 3024 × 2016 for a 6 MP camera).
Facial Photography Studio and Technique
To ensure reproducibility, a dedicated photography room should be utilized. With lighting for the background, the front, and both sides, one can create a good picture without shadows. This even lighting scheme is intuitive, simple to create (although not inexpensive), produces soft rather than harsh facial features, and does not require a flash. An alternative and comparable lighting scheme would consist of two front lights positioned at 45 degree obliquities and a background light (Figure 1). These two oblique lights can also be used for patient alignment on oblique view acquisition. If a separate flash is used, it should be positioned in front of the patient so that the shadow develops behind the patient.
The patient should be devoid of all personal affects, and the background should be uniform. The background can be a single color sheet or wall, preferably black or blue. The patient’s hair, if obtrusive, should be fixed behind the ears to allow visualization of all facial landmarks.
The camera can be positioned on a tripod, which is recommended, at the height of the patient’s face. A frontal, two oblique, two lateral, and a worm’s-eye view are the conventional views to be obtained, although other orientations and animated views may be useful for certain procedures. Floor markings for patient foot position enhance reproducibility. Uniform head alignment can be facilitated by placing marks along the wall to focus and orient the patient gaze. The midsagittal plane, by using the grid viewfinder, can be used to align head position. Frankfort’s line, representing the infraorbital rim in continuity with the tragus, can be used as a reference for the horizontal level. In addition, the canthi or tragi position can serve the same purpose. To minimize rotation in the frontal view, reference the visibility of the ears.
Legal Issues in Photography
Consentshould be obtained from the patient before photographs are taken. Consent should include mention of publication (journals or textbooks) or display (presentations, web sites).
Click on the links below to view a few of the chapters written by Dr. Hughes
Chapter 2: Photography in Plastic Surgery
Chapter 3: Facelift
Chapter 4: Fat Grafting
Chapter 5: Fillers
Chapter 6: The Role of Dermal Matrices in Breast Augmentation
Chapter 7: Scar Revision in Plastic Surgery
Come to Hughes Plastic Surgery in Los Angeles and Beverly Hills. You will be glad that you did.
